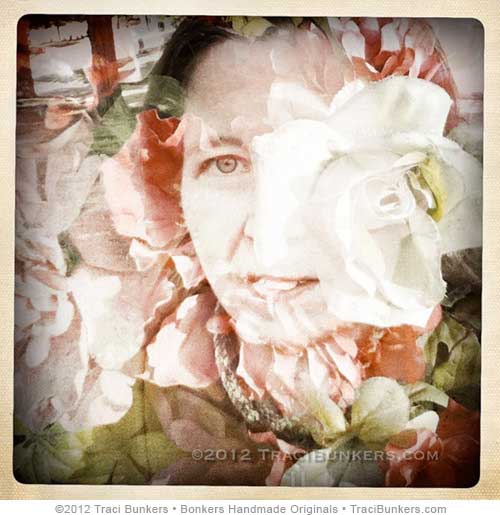
Today I took my dog for an afternoon walk, and played with the new Hipstamatic multiple exposure kit on my iPod touch. I had so much fun! Luckily my dog is pretty patient with me when I’m taking pictures.
Here’s a self-portrait that I did. I thought it might work well on one of the new paintings I’m working on.
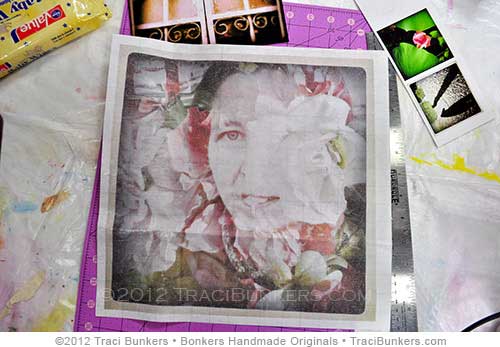
I printed it large, 12″ x 12″, onto Fusible TissueTex so it would be translucent.

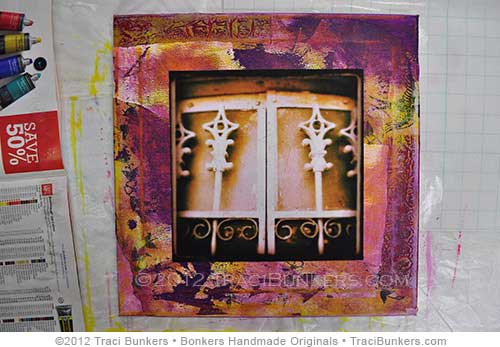
After peeling it off of the backing paper, I played around to see which canvas it would look best on. Then I fused it onto this one. I think it looks pretty awesome, but I wish the photo showed up a little more. Does anyone have suggestions for what might work similarly, but not be as translucent?
The piece of course isn’t done, but putting on the self-portrait was a pretty bold move. Next I’ll work on it to integrate the photo into the piece. The photo looks small here, but I it’s on a 24″ x 30″ canvas.
With this piece, I printed the photo that I took the other day onto canvas, then put it onto one of the collaged & painted stretched canvases I have been working on. Now I can work it more to make it cohesive.
Hey, today marks the first week done of 30 Days of Get Your Art On!


Been MIA for a few days, but I did several things today…
http://loreclectic.blogspot.com/2012/10/get-your-art-on-day-seven.html
Traci, I love the way you used your portrait in the collage. It’s very inspiring.
So cool with your picture. So greate. Need to try it.
My day looked like this
http://avcamilla.wordpress.com/2012/10/07/30-days-of-get-your-art-on-oct-7/
I am curious if it would show up more if you made more of the surrounding areas blend back in?! I think sometimes the suggestion of something is more effective than the clarity. Just a thought.
Also, I’ve used tissue paper transfers in a similar way and found that when I used a black and white rather than a colour or grayscale scan it worked better and even blended in more.
I actually quite like how your self-portrait is looking, though I know it’s NOT the same as seeing it as you are.
I don’t think that blending the surrounding areas would make the photo show up more. I’ve thought about just fusing another print (of the same photo) directly on top of it. But that would also obscure what’s underneath more than I want! it’s a fine line. I e-mailed where I bought the tissuetex to see if they had suggestions. And they said next time to layer my printed tissuetex on top of a plain one to cut back on the transparency. And yes, I’ve done b/w transparent photos that did work better in a way because they stood out more. But I wanted this one to be color.
Do you print the Tissuetex on a laser or inkjet printer? Can you adhere it to paper? Can you cut out shapes? Does it fray? I Goggled it and saw some of the beautiful dyeing done with it. Do acrylics and water color work?
Love, love watching you put together you pieces for this challenge! Inspiring as always.
Regular tissuetex you can print in either printer, but with the fusible, you probably can’t use a laser printer. It might melt the fusible part from the heat of the laser printer. I’m printing it on my Epson R1900, which is a giclee photo printer that uses pigment ink (so, a fancy inkjet printer).
You could adhere it to paper–it IS paper. But you can adhere it to whatever you want, especially since it’s fusible. Yes, you can cut and paint and do what ever you want to it. Pretty great stuff, but it’s hard to find and the fusible version is expensive.
I love your self-portrait! You look so pretty, and combined with the floral part of the exposure, reminds me of a southern belle during WWII. Gorgeous, just by itself.
Thanks Trece!